Thursday, November 7, 2013

Placards for house cars — prototype

Placard use on tank cars, to identify specific cargoes and warn workmen about the hazards associated with them, is a familiar topic. I have discussed the content and appearance of these placards in both the prototype (see: http://modelingthesp.blogspot.com/2012/03/tank-car-placards-prototype.html ) as well as ways to model the different forms of the placards (see: http://modelingthesp.blogspot.com/2012/03/tank-car-placards-modeling.html ).
     But placards are applied to other types of freight cars besides tank cars, and the presence of placard boards on sides and ends of house cars is a familiar modeling detail, familiar on box and refrigerator cars. I mentioned applying a placard to a model box car in a recent post (which you can view at: http://modelingthesp.blogspot.com/2013/10/evaluating-freight-car-fleet-upgrade.html ) and that stimulated an email question from a reader, asking if I would say a little more about these kinds of placards.
     There have been a number of boxcar-type placards in various decal sets, but the best commercial set of placards I know of is the Jaeger set (no. 2100) which I mentioned in my post about the box car placard, cited above. These are on very thin card stock, and cover a lot of possible placard messages. They include “unload this side,” “unload other side,” “careful, auto parts,” “do not hump,” “fragile, clay products,” “paper, handle carefully,” “appliances, handle carefully,” and others. Given that they are in HO scale, the identical type face and arrangement of them all is not a problem.
     Over the years, I have picked up discarded prototype placards around freight yards and sidings. A few of these are distinctive and I think deserve model use. I show a few of them below. First, a white placard, which is sized at 12 x 10.5 inches.


The color is usually manila or white, but this next example demonstrates that not all placards are so plain. It is 11 x 9 inches.


Of course, any white placard on paper or cardstock could be colored with a “highlighter” marker, in yellow or other colors.
     Here is another example, which is 12 x 9 inches.


Note that a clerk has made a notation on this one.
     Finally, an “unload this side” placard which looks quite different from the Jaeger version of the same wording. It is 14 x 7 inches. It is also of quite different proportions, compared to the ones shown above.
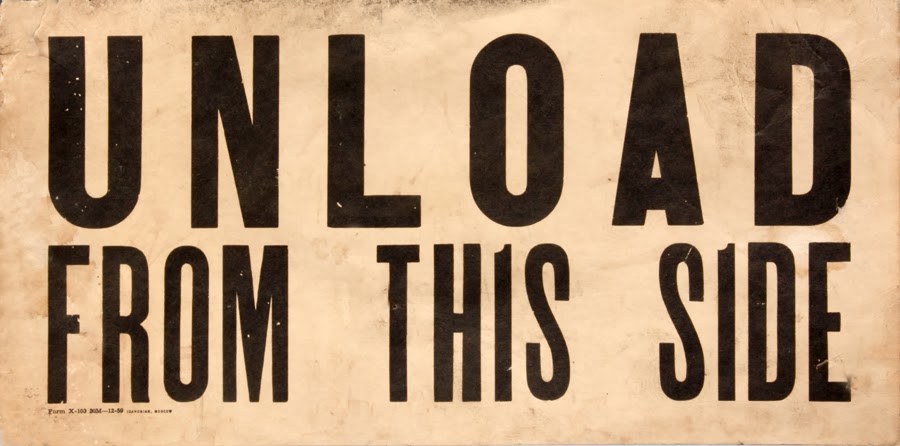

It may be noted that the maximum dimension of all these placards, 14 inches, is well within the width of the wooden part of a placard board, usually 22 to 24 inches on the prototype.
     These kinds of placards are readily turned into HO scale objects by scanning or photographing them to make a digital file, dividing their dimensions by 87, then printing them on a high-resolution color printer, available at most copy shops. I will show examples of these in model form in a future post.
Tony Thompson

Monday, November 4, 2013

The Iron City Award

Awhile back, in discussing the little red truck that shows up in some of my layout photos, I mentioned the Iron City Award. Both the truck and the award were outgrowths of a friendship among three Pittsburgh modelers: Larry Kline, C.J. Riley, and me. After awhile, we had a weekly round-robin at our houses, involving layout work or layout operation, and beer consumption, not to mention traveling together to Mid-Central Region (MCR) and other NMRA conventions. With a group of only three, we felt we should compensate by having a correspondingly long name. We called ourselves the “Iron City Ferroequinological Society,” or ICFS. We pronounced it “ick-iffs,” and in fact, having remained friends, we still do.
     The award, as I described in that earlier post, was intended to reward the skillful or insightful kitbasher, who had no real chance under the NMRA contest rules of those days, but had still built a pretty terrific model. You can find that post at: http://modelingthesp.blogspot.com/2013/07/that-red-icfs-truck.html .
     The criterion for winning the award was simple: we gave it to what we perceived to be “the niftiest model” in the contest, and naturally one dimension of “nifty” was that it was not scratchbuilt. Modelers with a good eye can often create something very impressive without much scratchbuilding, as the NMRA contest now is closer to recognizing. I don’t mean to disrespect scratchbuilding here, and in fact I do it myself whenever necessary, but the old NMRA contest rules put way too much weight on it, as a component of overall model quality.
     The physical award we gave out, which I took responsibility to create each year, was an HO scale freight car, of suitable size so I could make a good display out of it, with graphics taken from a bottle label of Iron City Beer (which was brewed in Pittsburgh). The car was then mounted on a small piece of track on a wooden base, and a plaque attached with the place and year.
     I don’t seem to have any photos of the various awards we made, but I did make a duplicate of one of them, the 1987 car, to keep for myself. Here it is, without base or plaque. As you can see, it is merely an Athearn Pullman-Standard covered hopper, repainted and suitably decorated.


     As may be evident, there was a certain tongue-in-cheek quality to this award, and not a little intent to tweak the nose of NMRA contest mavens, with which MCR was liberally supplied in those days. Again, however, I hasten to point out that this was not really disrespect. (The award had been authorized by MCR.) All three of us entered and won NMRA contests in those years; all three of us have served as contest judges for regional and national NMRA contests; and all three of us were involved in the drive to “reform” the NMRA contest scoring to recognize a much higher point total for the category of “prototype conformity” and comparably to decrease the points for scratchbuilding. I even served a number of years in the 1990s as regional contest chair in NMRA’s Pacific Coast Region (in the process, implementing and publicizing the new contest scoring rules).
     But I think it remains true today that some outstanding modeling is being done, usually to achieve a prototype replica, which nevertheless does not compete very well under NMRA rules. That’s okay, in one sense; the NMRA contest is just one set of rather specific rules about assigning points during judging of models. In another sense, though, I think it heightens the impression many have that the NMRA is not really very relevant to a lot of modelers. I happen to be a Life Member of NMRA, so I guess that doesn’t apply to me, but clearly it does apply to an awful lot of people in the hobby.
Tony Thompson

Friday, November 1, 2013

Constructing Santa Rosalia — staging tracks

In my first post about constructing my new town of Santa Rosalia (see: http://modelingthesp.blogspot.com/2013/09/constructing-santa-rosalia-staging-under.html ), I showed the construction of the staging which is to be located underneath the town itself. Santa Rosalia is at the end of my mythical Southern Pacific branch line, as I depicted in an earlier post (you can see it at: http://modelingthesp.blogspot.com/2011/01/layout-design-locale.html ).
     My next step was to install track and electrical feeders for the staging. The L-girder track support is wide enough for two tracks, so I decided to include both of them. Here is a view of experimenting with track spacing.


This installation would require a turnout from the single track coming off the main line (just out of view to left), and the turnout in turn creates a problem. There is no room alongside the staging tracks for a switch machine, nor would it be practical to work underneath the track in the rather limited space there. One possibility might be to try and install an extended throwbar.
     The idea here was to install a switch machine on the far side of the adjoining mainline track and somehow to run the throwbar underneath that intervening track. The first step in creating that arrangement was to glue a 1 x 3-inch wood support underneath the roadbed, and add a pair of Homasote spacers to bring the top of the added pad (the blotchy orange piece) to track level.


In the left foreground, the mainline loop track has been temporarily removed so the switch machine installation can proceed. The turnout lying on the staging shelf is not in final position, but has simply been moved out of the way of the gluing operation.
     My solution to extending the turnout throwbar to the offset switch machine was to use a 1/8-inch styrene tube, through which a 0.025-inch wire could serve as an extended throw bar. This in turn was placed in a trench under where the main line track would be. In the view below, the white styrene tube in its trench is evident. The switch machine isn’t yet connected. And yes, it’s a twin-coil machine. These are positive-acting and dependable devices, in my view, and I like them for hidden track, where the action of a “slow-motion” machine isn’t visible. They also have built-in contacts for frog power.


     Some quick testing showed that this arrangement works mechanically. Now I could go ahead and re-lay track on the original main line, as well as lay the staging tracks. Each length of track was given its own pair of feeders to ensure good electrical performance.
     When all track-laying was complete, the area of the new turnout and its extended throwbar looked like this, with the main line in the foreground.


This next view shows the entire new staging area, with all electrical connections made.


     Of course the next step was a “smoke test”—put a locomotive on the track and turn on the power. If no smoke is seen, run the locomotive over the new track. So I did that, and everything worked fine. Here is a shot of the first train on the new staging tracks.


The tank car, incidentally, is an acid car, which has a scratchbuilt tank and dome; I described it in an article in Railroad Model Craftsman (issue for January 2012, pages 61ยบ66), and showed a picture of the car in a previous blog post (here’s a link: http://modelingthesp.blogspot.com/2011/01/tank-car-projects-for-cocoa-beach-2.html ).
     With this staging area done, I can proceed to add the track board for Santa Rosalia, above this staging, which is what I started out to do in the first place. This modest staging track project comprised pretty straightforward track location, distinguished only, perhaps, by the need to design an extended throwbar for the switch near the wall.
Tony Thompson

Wednesday, October 30, 2013

Evaluating the freight car fleet — an upgrade

In the previous post on this topic, while giving some general comments and a few statistics on my freight car fleet (you can read that post at this link: http://modelingthesp.blogspot.com/2013/10/evaluating-freight-car-fleet.html ), I mentioned that a lot of the change in my fleet of cars has come about as older and less detailed or less accurate models are replaced with better ones.
     Here is just one example of a car replacement which represents an upgrade. For some years, I had rostered a single representative of SP’s Class B-50-22 box cars, a 50-foot single-door car. The old Athearn kit of this type was a stand-in, partly because of the unfortunate Athearn roof, for some reason created with one too few panels (the same is true of the Athearn double-door automobile car). A number of other details are likewise incorrect for SP, such as the pattern of side panels, and the sharp-corner Dreadnaught end, and of course molded-on parts like ladders are a drawback. But with details upgraded, such as wire grab irons, door claws removed, brake step extended, and scale-size Ajax brake wheel, and so on, as I have described in several previous posts about Athearn cars, it looks okay.


This model has now been given away.
     The best replacement is the Proto2000 model of this car type, having a correct roof, door, six side panels on each side of the door, and W-corner-post ends. It also has free-standing details, particularly evident on the car ends. The only evident things needing replacement are the running board, which should be Apex steel grid (I used Detail Associates Part no. 6204 for this), and the hand brake, which should be Klasing. As there is no decent HO scale Klasing hand brake at present, I used a similar-appearing Equipco by Kato.


Note I added one of the Jaeger placards about auto parts to the placard board, from their set #2100.
     The weathering here is fairly severe, as this is a pre-1946 paint scheme for my 1953 layout era. I used my usual acrylic paint technique, outlined previously (you can download the handout from the joint clinic on weathering techniques, written by Richard Hendrickson and me, at the following link: http://modelingthesp.blogspot.com/2011/10/weathering-clinic-handout.html ). 
     This is not a particularly important replacement, and I only show it because it is a recent one. But the same kind of process continues in my freight car fleet, upgrading to more accurate models as the opportunities present themselves.
Tony Thompson

Sunday, October 27, 2013

The Naperville meeting, 2013

The annual meeting known as Naperville (even though this year it was a few hundred yards outside the town boundary of Naperville, Illinois, in the neighboring town of Lisle) was a fine event as always. Held at the Wyndham Hotel on October 17–19 this year, it gathered more than 320 attendees from every corner of the U.S. and Canada, justifying its nickname as “The Freight Car National.” Among my previous posts commenting on Naperville is one which mentions the change in management from Martin and Patricia Lofton of Sunshine Models, to Joe D’Elia, proprietor of A-Line and other products (Here’s a link: http://modelingthesp.blogspot.com/2011/10/meeting-highlights-lisle.html ).
     This year’s meeting, as always, was marked by excellent model displays (perhaps not quite as numerous as some years), fine portable layouts, and a very fine vendor’s room. Talks by a wide range of clinicians are a central part of this meet, and there were a number of fine ones this year. And for some of us, the visit to the Chicago area is an opportunity to operate on some of the fine layouts within range of the hotel.
     The four rooms used for talks this year were a little small, and any popular topic would find not only all seats full and standees around the rear of the room, but a few folks sitting on the floor in front of the rows of chairs. Nevertheless, I found the program good, and I heard the same from a number of other attendees.
     Highlights for me personally were Perry Sugarman’s detailed presentation on “The Role of the Station Agent,” Jim Dick’s clinic entitled “Nelson-Gilbert: Getting Closer to the Railhead,” and John Brown’s talk on “Auto Frame Loads.” There were also good talks by Jim Ruffing on SP&S freight cars, by Bill Welch on pattern-making for resin casting, and not least, the after-dinner talk (the Friends of the Freight Car Dinner) about ExactRail products by Blaine Hadfield, head of product development at ExactRail. With all that in mind, you can appreciate this expectant audience in one of the clinic rooms, right before kickoff.


At left in the front row is Mont Switzer, with Chet French beside him, but I won’t go through the rest of the audience, naming names. Still, the many familiar faces is a reminder of a great value of this meeting — catching up with friends who live far away.
     Here’s an overall view of one table in the model display room, but a single photo naturally can’t begin to do justice to the array of fine modeling.


The gray-bearded fellow across the table is John Spencer.
     The vendor room likewise contained too much to show in a single view, but here is one part of the room, with Sharon Camerlengo visible under the Funaro & Camerlengo banner. Assembled samples of F&C kits are at right.


Probably the most active table among the vendors was Tangent Scale Models, with proprietor David Lehlbach seen here in the orange shirt.


The reason was simple: Tangent released a marvelous tank car model at the meeting, a General American 6,000-gallon car with three compartments, and they sold like hot cakes. For more on that, I can only defer to their web site, where you can see much more of the model than I could show here. Visit them at: http://tangentscalemodels.com/ .
     Lastly, one layout operating opportunity I had was at Bob Hanmer’s fine re-creation of the GN Mesabi Division, and the DM&IR, in Minnesota. Here is fellow operator Andy Sperandeo completing switching in the yard at Grand Rapids. I was yardmaster at Gunn, out of sight just to the right of this view.


I especially liked Bob’s well-thought-out graphics at each switching location. Here is the graphic at Gunn (click to enlarge), placed on the box which holds waybills. Bob’s waybills are the Steve Karas design, 4.25 x 5.5 inches in size (a quarter-sheet of paper), and are the single-use type, no car cards. This is my kind of car distribution!


     All in all, another fine Naperville (well, yeah, Lisle) meeting. Many of us are already looking forward to next year.
Tony Thompson

Friday, October 25, 2013

Model tank car placard decals — an update

In my previous blog post on this topic, I described an idea I had, which was to figure out some way to incorporate the frame of the placard holder into the model placard we apply on tank car placard boards. (It’s available at this link: http://modelingthesp.blogspot.com/2013/10/model-tank-car-placards-refinement.html .) Since then I have been amazed at what I have heard.
     I said in that post that I was going to pass along my idea to decal manufacturers, hoping there might be some interest. I would have been happiest to hear about a one-piece placard decal, which incorporated both frame and placard in one, but certainly could use a decal just representing the frame, to apply over a model placard. To my astonishment, Microscale responded that they already have such a set ready to release. It is tentatively scheduled for November 1 of this year, and is Mini-Cal set MC-5030. With Microscale’s permission, I reproduce the artwork below. (Although this set isn’t released yet, many readers probably know that you can order Microscale decals on line, at: http://www.microscale.com/ .)


     As is evident in this artwork, all frames are shown as white or metallic silver, perhaps all right for highway trucks but certainly not typical of railroad tank cars in most years. But I am told that Microscale will likely revise this artwork to make a fair number of the frames black, as we need for 20th-century eras of tank car use. So  I, at least, will need to wait and see whether there are a goodly number of black frames in the final decal set, before I know how useful set MC-5030 will be for me.
     Other points: about half the frames also include the retainer clip typical of modern Haz-Mat placard holders, but not applicable, I believe, for tank cars prior to the 1970s. These can either be ignored or cut off. There is also a size issue. Even though placards are a standard size and have been for many years, model manufacturers seem not to grasp this, and model tank cars have been produced with a wide range of placard board sizes. You can of course add a thin sheet of styrene of the correct dimensions over a too-small placard board, as I have done in a few cases.
     Lastly, another decal maker has expressed interest in a one-piece version, that is, with both frame and placard all in one decal. This will be a great convenience, assuming it materializes, and I will say more about it if it progresses toward reality.
Tony Thompson

Tuesday, October 22, 2013

Model tank car placards — a refinement

Awhile back, I posted some descriptions of the prototype and model use of placards on tank cars, for my era (1953). Here are links to them: Prototype— http://modelingthesp.blogspot.com/2012/03/tank-car-placards-prototype.html ; Model— http://modelingthesp.blogspot.com/2012/03/tank-car-placards-modeling.html . Subsequently, I described my model placards, at: http://modelingthesp.blogspot.com/2012/12/tank-car-placards-more-on-modeling.html .
     But there is one nagging problem with my model placards. The prototype placard is placed in a holder. Until about 1933, placard boards on tank cars were simply wood squares, mounted “on point” in a diamond configuration, and placards were tacked to them. But about that year, metal placard holders came into use and were soon a de-facto standard. The placard is slipped inside them and is held in place by crossbars. They are in use today, on railcars and (in a similar form) also on highway trucks. Here is what they look like:


This image is taken from a website of a seller of these parts; it’s at: http://www.labelmaster.com/resources/catalogpdfs/G12%20pdfs/Placards%20&%20Placarding%20Systems/G12%20p89.pdf . The product is called the “Rail Slidemaster,” is 12.5 x 14 inches in size, and only costs $15, if you’d like to own one.
     My post about prototype placards, cited at the top of the present post, included a picture of a workman inserting a placard into one of these holders.
     There are lots of in-service photos around, which show these holders clearly. Here is just one example, a detail of a 1971 Frank Szachacz photo. The placard is an “empty” placard, with the right half of the placard all black (for more about that, see my post on prototype placards, cited above).


The message here is that the holder is pretty visible, not just the placard itself. That in turn means that simply applying a decal or printed placard onto a model placard board isn’t correct; the crossbars of the placard holder ought to be visible “in front” of the placard, with the placard “inside” the holder.
     So I think I will try representing this situation by modifying my model placards. Since my placards are just HO-scale images of real placards, printed out on a high-resolution printer, I can modify those HO images by superimposing an image of the placard holder on the placard image. I will report on that in a future post.
     Another way to attack this problem would be to make decals of the holder, with the black placard holder on clear decal film. Then you could place that decal over an existing image of a decal or printed-out placard. I will suggest this to some of the decal makers out there. Of course, an even better arrangement would be if decals of placards included the holder bars across the image. Then only a single decal would have to be applied to a model placard board.
     This is only a refinement, to be sure, in the overall placement of placard boards on model tank cars. But it does add that little additional bit of accuracy and realism to your models.
Tony Thompson