For this 25th part of my series on post-1990 graffiti on freight cars, I have two different car types to discuss, a box car and a covered hopper. I have presented a wide variety of car types in prior posts on this topic, and they can be most easily found, if you are interested, by using “freight car graffiti” as the search term in the search box at right.
I’ll begin with a 60-foot box car, this particular one owned by the Cotton Belt, St. Louis Southwestern, a property of Southern Pacific. This particular model, SSW 62649, was shown to illustrate the paint scheme, in an earlier post at: https://modelingthesp.blogspot.com/2020/12/freight-car-graffiti-part-17-60-foot.html . Here is the model before adding any graffiti:
I wanted to use one of my paper overlay graffiti on this car. This is a technique I described in my article about graffiti in Model Railroad Hobbyist, in the issue for January 2020, and in a previous blog post (see it at: https://modelingthesp.blogspot.com/2020/01/my-latest-column-in-mrh.html ).
In this case, I used a graffito seen on a wall in my area (photo of it below), then it was cleaned up, sized for HO scale, printed out on a high-resolution color laser printer, cut out, sanded from the back to make the edges thinner, and pasted down with canopy glue.
In addition, on the car’s left side, I added a decal from Microscale set 87-1523, some light weathering, and a few tags using “Gelly Roll” pens. This is how it looked when completed.
On the right side of SSW 62649, I used decals from three Microscale sets, 87-243, 1534, and 1536, along with the usual weathering and tagging.
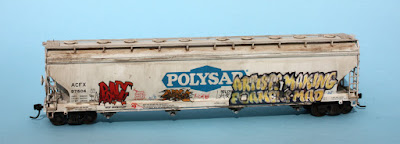
The other car I will present here is a large, four-bay covered hopper, ACFX 97604, operating under lease from American Car & Foundry’s lessor, ACFX, and lettered for Polysar resins..
The large, smooth sides of this model are as attractive for large graffiti pieces as are the prototype covered hoppers, because they offer a large, unimpeded canvas for “creative expression,” as we may term it (certainly the prototype “writers,” as they call themselves, would use the term).
On the left side of the car, I applied the large piece (“can’t be stopped”) from Microscale set 87-1535. The smaller piece at the right (the word “look”) is a paper overlay, taken from page 136 in the excellent reference book, Freight Train Graffiti, by Roger Gastman, Darin Rowland, and Ian Sattler (Abrams, New York, 2006), and applied as I’ve described earlier (see citations in the third paragraph, above).
Of course, the model as you see it above is weathered moderately, and some tags added with “Gelly Roll” pens.
On the right side of the car, there is again a paper overlay, this one created from a prototype photo of this piece on a similar car (I showed it in a blog post about the Cocoa Beach RPM meeting in 2017; a post you can see here: https://modelingthesp.blogspot.com/2017/01/cocoa-beach-2017.html ). I have adjusted the size of the image, along with squaring it up in Photoshop, for this overlay (at right, reading “artists making foamers mad”). The two smaller pieces are from T2 Decals, Graffiti Set #1 (you can see their growing line of graffiti decals at: https://t2decals.ecrater.com/c/135116769/graffiti-decal-series ).
These two cars gave me another chance to apply paper overlays, a technique I now feel fairly comfortable with. I like that it allows inclusion of graffiti I have photographed myself, with minimal effort. And I think both these cars benefit from this flexibility.
Tony Thompson


Thanks for this info. I have struggled with adding graffiti to my cars. I model SP around 89-93 and it seems to be pretty rare other than the simple tags. I would like to add one or two but certainly not a lot.
ReplyDelete