Friday, June 9, 2017

Riding trains in Japan

During much of the month of May, my wife Mary and I were traveling through Japan, starting in Tokyo and seeing much of central Japan, including the Japanese Alps, and then heading south and west to end our trip on the island of Kyushu, at Fukuoka. The long-distance and even some local travel was by train. That’s what I want to write about in this post.
     The bullet-train system of Japan, the Shinkansen (which just means “new trunk line”), has been around more than 50 years, with the first trains entering service in 1964. So it’s not exactly a new idea, but the Japanese have continued to innovate, improve, and increase speeds. Those are reasons the Japanese continue to be leaders in much of this technology.
     We first rode the oldest of the lines, the Tokaido line, which connects Tokyo and Osaka. Though it initially operated at 125 miles per hour, its speed has been progressively increased, with the current N700 trainsets normally running at 180 miles per hour.  Naturally these are now far more aerodynamic than the 1964 trains. Here is the end unit on an N700 trainset (both ends are the same).


     Perhaps the most surprising aspects of all these train are the passenger densities. They are very high on most lines, with the Tokaido line remaining the busiest, carrying more than 150 million passengers per year. At the busiest times of the day, morning and late afternoon, there are 13 trains per hour on this line alone, little more than 4 minutes between trains. These are 16-car trains, with 1323 seats per train, and it is indeed dramatic to witness the very rapid boarding and exiting of passengers. Here is a shot of a couple of the 16 cars in an N700 train.


     Of course Japan is not all Shinkansen trains. First of all, there are shorter routes of all kinds, along with local train service. The vast majority of Japan is still the 42-inch gauge recommended originally by British consultants when railway construction began in Japan (this gauge is rightfully called “Empire gauge” for its prevalence in many parts of the former British Empire). But the Shinkansen lines, specially constructed for the very high speeds, are all “global standard gauge” (4 feet, 8.5 inches). We rode a bunch of these local trains too, in many different areas. For example, here is the very nice “express” we took from Takayama to Kyoto. It was a six-car train, ad though most of Japan is electrified, it is diesel-powered.


The cars were a very familiar size from U.S. practice, 68-seat coaches, 17 rows of 2 + 2 seating. Like all the trains, they were clean and comfortable, and with very adequate leg room.


Probably among the most impressive things about Japanese railway travel is the number and length of tunnels. It’s a mountainous country, and every line we rode had tunnel after tunnel. The sheer investment is daunting. No wonder that tunneling is another technology in which the Japanese are leaders.
     The biggest cities, like Tokyo and Osaka, have “heavy-rail” commute services mixed in with subways. In Tokyo we rode the Japan Railways lines several times, and these were less crowded than the subway (at least when we rode the two modes). Here is such a train. In the lower right corner you can see the JR emblem.


The railway system in Japan was formerly government-owned and operated, under the name Japanese National Railway (JNR). Since 1987, however, it has been privatized into seven companies, but they adhere to strict rules on maintenance, operating practices, and cooperation, and are collectively known as the Japan Railways Group companies, all branded as JR.
     Most Japanese cities of any size have replaced their streetcars with subways, but there are exceptions. For example, here are typical streetcars in Hiroshima, modern and fairly quiet cars.


     Putting it all together, trains are really excellent transportation in Japan, fast, frequent and not excessively expensive. The only drawback for the traveler, as opposed to the commuter, is that hardly any trains have provision for luggage. The overhead racks are not large, and there usually is no luggage section at the end of cars. But all in all, we really enjoyed our train experiences in Japan.
     We also visited a superb railroad museum in Kyoto, which I will describe in a separate post.
Tony Thompson

Tuesday, June 6, 2017

The East Shumala stock pen, Part 4

Awhile back, I posted a short series of descriptions of work on the stock pen at East Shumala on my layout. The general background for small stock pens, and my design intentions, were presented in the first post in the series (it can be found at: http://modelingthesp.blogspot.com/2015/03/a-stock-pen-for-east-shumala.html ). I followed up that post with a second article about how I built the basic stock pen from a kit, with some added fencing (that post is at this link: http://modelingthesp.blogspot.com/2015/06/the-east-shumala-stock-pen-part-2.html ).
     I added two structures to the stock pen complex, a traditional California tankhouse and an office. Descriptions of the modeling work, or additional  links for those projects, were in the third post in the series (you can read it at: http://modelingthesp.blogspot.com/2015/10/east-shumala-stock-pen-part-3-office.html ). The present post shows completion of the complex by adding a third pen.
     As the two pens in the original AHM kit were about 15 by 25 scale feet in size, I chose to make the third pen the same size, even though this is smaller than most prototype stock pens. The simple way of making the added pen was to use sheet styrene for a base, and build fencing using styrene strip. That was the basic construction method of the added fencing for the AHM kit also. I showed the fencing method in Part 2 of this series, accessible at the link at the end of the top paragraph in the present post. In the photo below, the added pen has been assembled and given a primer coat of light gray. I added a watering trough with pieces of scale 2 x 12-inch styrene strip.


The next step is painting the fencing a weathered wood color, then adding soil to the “floor” of the pen. I will match the previous parts of the stock pen fencing by painting with Star brand "Seasoned Wood” brown.
     But before I went further, I had to face up to the topic of populating the pens with suitable animals. The area I model is one which includes ranching with beef cattle, so any modeled cattle on my layout should be breeds used for beef, not dairy cattle. The most prominent breed of dairy cattle in the U.S. is the Holstein, the familiar black and white “splotched” animals, so I wouldn’t use those. Beef breeds in the west are primarily Hereford, with some Angus. The former are reddish brown with white heads, stockings and bellies, while the latter are entirely black. I show below photos of each breed, found on the web.


     As it happens, Woodland Scenics makes nice sets of both Hereford and Angus cattle, and I bought some sets of each. I also had a few Holstein animals in my stash of figures, which I simply repainted to either Hereford or Angus colors. One has a base, and can be put just inside the front fence so the base won’t show. Any other bases were cut off.


I have been told that the old Weston cattle (offered by Campbell Scale Models) were excellent renditions of the animals, but I have none of those.
     Since my fleet of stock cars includes some double-deck cars, I will explore having some model sheep or hogs to substitute for cattle, when such cars show up in the operation cycle.
     To color the soil area inside the stock pen, I repeated what I had done on the pen floors of the kit parts, namely to use tube acrylics, mixing Raw Umber  and Yellow Oxide. I took advantage of the thickness of the paint in this form to make the soil area look a little less than flat.


     Finally, here is the added pen, in place at the stock pen location in my layout area of East Shumala. The tankhouse and office alluded to earlier are visible here. The area is still being scenicked, so does not look complete as to soil and vegetation. I have been waiting to do ground cover, bushes etc. until structures were all done.


     I am pleased to finally have my three stock pens, as planned, to serve at this industry. A full load of stock in a railroad stock car is more cattle or sheep than most people ever display in their layout stock pens, an effect I hope to minimize. Of course, stock might be delivered over a few days until the full load is ready to go, but there should still be more in the pen than a mere handful.
Tony Thompson

Saturday, June 3, 2017

White flags on extra trains

Most years I attend the Railroad Prototype Modelers fall meet in suburban Chicago (a meeting long known as “Naperville” for the then-site of the convention hotel, now called “Chicagoland” since it moved to a hotel a quarter of a mile away in the adjoining town). A highlight of these trips is a chance to operate on Bill Darnaby’s excellent layout, the Maumee Route. A couple of years ago, I filled the Yardmaster and Hostler jobs on the Maumee, and one part of hostling was the insertion of HO-scale white flags into flag stanchions on locomotives of extra trains. (Use of such flags is usually described in prototype rulebooks under Rule 21.) I thought it was a delightful touch of detail. Here is a photo of one of the Maumee engines, borrowed from Chapter 5 of Tony Koester’s book, Model Railroading from Prototype to Layout (Kalmbach  Books, 2010). The white flags look great.


     On returning home from these trips, I thought, more than once, “I’d like to do those white flags on my layout.” Finally reaching the point of action, I began to browse my various sources of SP prototype photos to see how the flags looked, and quickly realized that there weren’t any. The answer must lie in the SP version of Rule 21, I thought to myself, and therefore looked at my 1943 and 1951 SP rulebooks to see how Rule 21 was presented.
     Turns out the answer is interesting. Here is a slightly abbreviated set of rulebook pages, setting out the SP version of Rule 21. (You can click to enlarge.)


I have omitted the details for engines running backward, etc. Rule 21(B) clearly shows that the only trains which would display white flags are those powered by engines that had no indicators. Indicators were entirely standard on SP steam, so lacking them would an unusual situation except perhaps for leased locomotives.
     Rule 21 in the SP version clearly means that the indicators (often called “number boards” by modelers and railfans) were relied upon to designate extra trains, just as they were relied on for identification of all other trains. This is made more explicit on the page for Rule 21(C):


     This foray into the SP rules means, of course, that I am not going to have white flags on my SP locomotives. Still, my models do have indicators and will continue to display (as they now do), the engine number plus an “X” as depicted in Rule 21(C). Here’s an example, on Mikado 3251:


Note the headlight is illuminated, as SP Rule 17 required after World War II.
     In a way I am disappointed not to be able to carry white flags on the extra trains on my layout, but at the same time am glad to have learned the SP rule and what it means. And my operators will be able to avoid the rather fussy task of putting HO scale flags into stanchions!
Tony Thompson

Wednesday, May 31, 2017

Creating a wine tank car, Part 3

In the previous post in this series, I completed the addition of two more domes, and a longer dome walkway, on the way to my stand-in tank car as a three-compartment conversion (the post about that work is at the following link: http://modelingthesp.blogspot.com/2017/05/creating-wine-tank-car-part-2.html ). Next comes relettering the car, and an attendant problem.
     The problem arises in choosing lettering for the domes. On multi-compartment tank cars, each compartment had its own capacity, and that capacity was lettered on the dome. The total for the entire car was usually not lettered on the car end, although it typically was for single-compartment cars.
     In addition, domes received identification symbols. On a car of four or six compartments, the compartments are numbered, respectively, from the A and B ends of the car, as you can see in this detail portion of an image of GATX 410, with A-1 and B-1 at the A and B ends, respectively. The center compartments then are A-3 and B-3. (You can click on the image to enlarge it.) Photo is from the Richard Hendrickson collection.


On a four-compartment car, the compartments are numbered A-1, A-2, B-2 and B-1 along the car from the A end.
     Most three-compartment cars, like my model, had end compartments lettered A and B, and the center compartment was given the letter C. That is shown below in a detail of the image of GATX 1095 (the same photo shown in the first post in the present series), and you can see all three compartment letters. But unlike the six-compartment car above, the designating letter was placed above rather than below the capacity numbers. In both photos, the diamond indicating an approved (bolted) manway is to one side of the other lettering.


     For a car number, I decided to use a General American car number from among one of their large batches of converted three-compartment cars. There are two such series, roughly GATX 1080 to 1190, cars which were almost all 6000-gallon cars (considerably smaller than the Walthers car I’m converting), and also the GATX series 1327–1410, most of which are near 8000 gallons. This is still a little smaller than the Walthers car, but is close. Thus this model is indeed a stand-in, and as stated, that was the original goal.
     Among the decal materials I inherited from Richard Hendrickson was a whole bunch of partly-used Roma wine decals, which have full sets of lettering for multiple compartments, perfect for this situation. I had to “bash” the lettering to get an approximately right set of capacities. Here is a view of just the dome lettering. I placed the dome identity letters below the capacities, and added diamonds also.


     The entire car came out pretty much how I wanted. It still needs to be weathered before entering service on the layout, but here is how it looked at this point, with all lettering complete and flatted.


     I felt like this “quickie” project did result in an acceptable wine tank car. It is a little oversize for the prototype car with the number GATX 1392, but not badly so. My project was partly intended to show how easy it really is to add domes to a single-compartment car, and I believe I did that.
Tony Thompson

Sunday, May 28, 2017

Figures, Part 5: more on painting

In the previous post in this series, I showed a few basic approaches I have used in painting or repainting HO scale figures (that post can be found at this link: http://modelingthesp.blogspot.com/2017/05/fijgures-part-4-painting.html ). I have some additional comments to add in this present post.
     Before starting, I will included a strong recommendation for a book I use all the time, Sheperd Paine’s How to Build Dioramas. It’s a 1980-vintage Kalmbach publication (I have the 1984 printing), and it was re-issued in 1999 as a second edition. It’s now out of print, but can be found at several on-line booksellers. Here is the first edition cover:


Its strength for me is a 14-page chapter on detailing and painting figures, and that’s the relevance to this post. The figures shown are not HO scale, but the ideas on both posing figures, and also on painting, are very interesting.
     Now I will show some of my figures with painting finished. First, I want to show the completion of the originally unpainted “Station Crew” figures from the AHM set that I showed in Part 4. The one on the right carries a dark green lunchbox.


     Another figure I want to “reclaim” from its original form was a man holding a tool of some kind, looking kind of like a rake or oversize mop (or perhaps a European farming tool). The figure is shown on the left below, in its original form. I cut off the base to add my usual clear plastic base, filed down the tool to look more like a broom, and cleaned up mold lines on the figure. Then I painted the broom handle light brown, the broom itself a “yellow sand” color, and changed the shirt color as well as fresh paint on the pants. The result is shown below on the right.


     In Part 4, I showed a metal figure in its original SS Ltd. package, a man in a pushing position. That figure too has now been painted in its entirety. I took advantage of the molded rag or bandanna in the man’s back pocket, and painted it red.


     In a comment to Part 1 of this series, it was mentioned that actual people have been scanned and then reproduced in HO scale by 3-D printing (see that post and comments at: http://modelingthesp.blogspot.com/2017/05/figures.html ). Digital files for these figures can be obtained from the thingiverse site, as was mentioned by Robert Bowdidge; you can see some of the “Great Fredini” figures at this link: https://www.thingiverse.com/search/page:1?q=Great+Fredini&sa=&dwh=395927872ac1884 . You can then get files printed by services like 3D Hubs.
     Robert gave me a couple of figures he had printed himself from the digital files, and I decided to paint them. Here are the two as I received them. Remember, these are actual people; for example, the woman is identified as “Amy S.” You will immediately note that these are not the athletic-looking bodies of many Preiser-type figures. Note also the comment by Robert, attached to my Part 1 post, that these figures do not have the subtle enhancements of edges of clothing items, that would make painting easier.


The painting process was like any other figure: first the flesh tones, then pants and shirts (if under a jacket), then the outermost items, jackets and shoes, along with hair.


     These exercises in figure painting have been instructive to me, as well as fun, and of course also generating some “population” for the layout. That leads to an additional topic, placement and arrangement of figures, and although they can be put almost anywhere on a layout, there are some guidelines you can use for most effective placement. I will take that up in a following post.
Tony Thompson

Thursday, May 25, 2017

House trailers

I still recall another modeler’s comment from some years ago, when I was on a layout tour. The layout we were viewing had a model house trailer back in one corner, amidst the scenery, and the modeler I’m referring to said, “House trailers are probably the commonest thing in America that modelers don’t include.” I was surprised when I heard the remark, but on reflection, realized that there was considerable truth in the comment. I’ve resolved ever since to act on that observation, but until now hadn’t actually done anything about it.
     There have been various models of house trailers commercially available for years. Naturally, some have been better than others. But I didn’t have to choose one, because I had in my stash of potential structures, a very believable 1950s-era trailer casting, one molded in one piece in clear resin by my long-time friend C.J. Riley. I decided to figure out a use for this nice casting.
     My layout doesn’t have space for much in the way of residential areas, and I have on occasion looked to see if I could find a spot where I could tuck a trailer among some trees. But recently I had an idea for a much better use. This trailer could be used as an office or storage space. So I took the clear resin casting, masked all the windows, and used a rattle can to spray it a primer-gray color. You can see its distinctive shape in the photo below.


To me, this is a perfectly in-era model. Thanks again to C.J. for conceiving it, making a master, and giving me one of the castings. I think he may have included this trailer in his line of resin-cast model parts, back a decade or so ago.
     Photos I could find on-line of old house trailers often showed doors of a contrasting color, with the same color sometimes repeated in a trim stripe or in the window frames. A semi-permanent trailer placement often has the running gear hidden behind a false wall around the base, as this model portrays, and this too is often a contrasting color. I also added steps up to both doors, from the Central Valley “Steps and Ladders” set, no. 1602.
     My idea for using this trailer was as a temporary office for my Port of Santa Rosalia. It can be placed near the sea wall and be an additional reminder that the cannery and fishing boat basin I’ve modeled are only part of the activities in the area. The office use would be designated by signage only, and could of course readily be altered to some other use in the future, simply by changing signs. (You can click on this image to enlarge it. The larger sign reads, “Harbormaster, Port of Santa Rosalia.” The smaller sign over the door simply says “Office.”)


     I had a small space near my Santa Rosalia waterfront, for which this trailer was perfect. It sits alongside Willow Lake Road, right across the street from the SP depot. An offshore fog bank is evident in the distance.


With the signs it now has, it can help remind visitors of the waterfront just beyond it. I will probably add a lawn and walkways in front of it, maybe a small parking area. And I’m glad to finally find a good use for my friend Riley’s nice trailer casting.
Tony Thompson

Monday, May 22, 2017

Free-running freight cars

When discussing freight car movements under such topics as waybills, car confiscation, and operations generally, the term “free-running” is applied to some cars. These are primarily box cars without special equipment or assigned service, and similarly gondolas and flat cars (provided they too do not have specialized equipment). When empty, these were available to be loaded anywhere, by anyone, if needed. So a shipper in Ohio could perfectly well load a box car from New England, or the deep South, or the Pacific Northwest, every bit as well as from a railroad with tracks nearby. (This may raise the topic of the Car Service Rules in some readers’ minds, and I will come back to that point, later in this post.) But cars could be sent anywhere.
     Modelers tend to know about this concept, but don’t always grasp what it means. For example, it’s commonplace for a modeler to see a photo of, say, a Western Pacific box car in Richmond, Virginia, and comment something like “that car sure is a long ways from home,” or even say, “What’s that car doing in Virginia?”
     The simple answer is that free-running cars went everywhere with loads, and could be reloaded wherever they ended up, once they were empty. Of course in times of slow economic activity, there might be a car surplus, and unloaded cars would mostly be sent homeward empty. But when cars were needed, which was most of the time, free runners were happily loaded by anyone, regardless of the geography.
     One testimony to the truth of these statements is the Gilbert-Nelson hypothesis. Those two men showed, at least for bridge-route railroads, that the frequency of appearance in train records, of freight cars from individual railroads, simply reflected the relative size of those railroads’ car fleets, compared to the whole nation's fleet. (I have discussed this at greater length in a prior post, which can be found at: http://modelingthesp.blogspot.com/2010/12/choosing-model-car-fleet-2.html .) The Gilbert-Nelson idea can only work if cars really are free-running, that is, if they can and do show up anywhere.
     I try in my own layout operating sessions to ensure that the largest railroad car fleets are represented in the freight cars on the layout. That means Pennsylvania Railroad, New York Central, B&O and Milwaukee, in addition to major Western road Santa Fe and home road SP. What is the basis for this? Shown below are the freight car fleet sizes for the biggest railroads, as I described in an article in Model Railroad Hobbyist  for December 2011 (read or download it at: mrhmag.com/magazine/mrh-2011-12-dec/ ). The fleets are shown minus the car types which interchanged less frequently, which means coal, ore and ballast hoppers. I discussed that point in the MRH article.


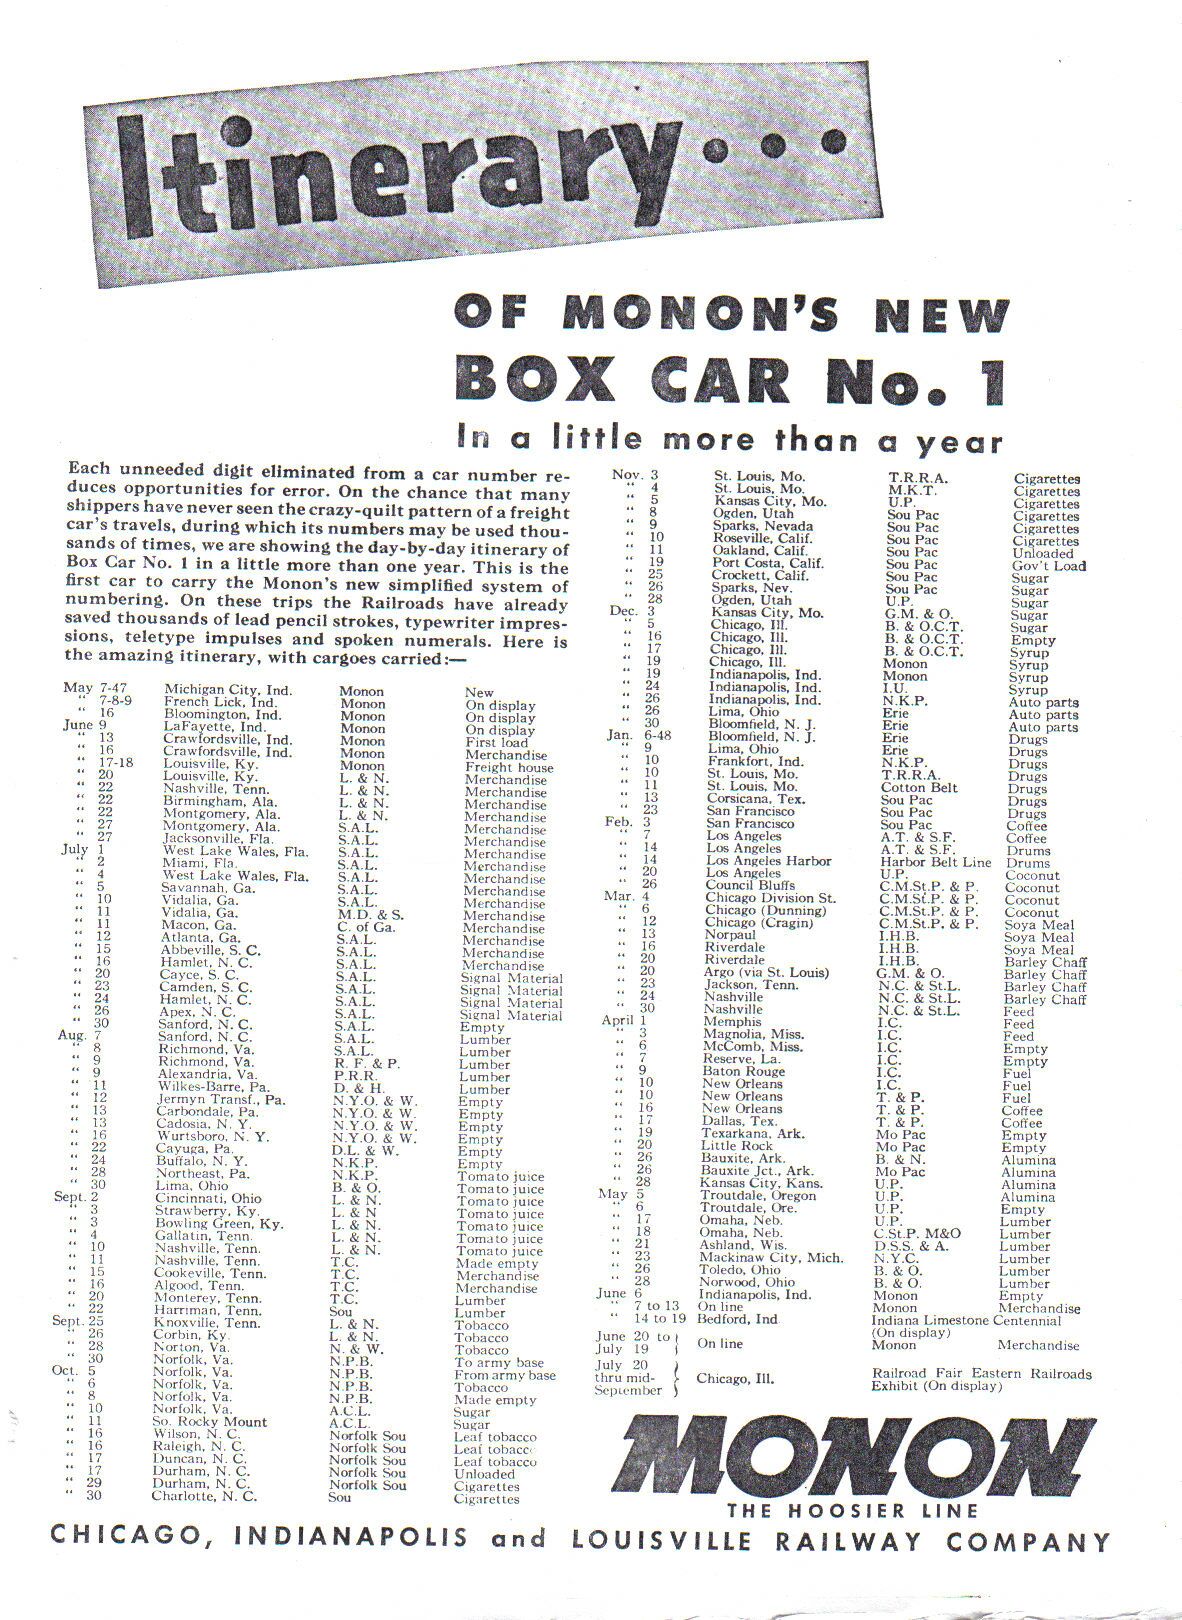
     Another point to recognize is that there do exist data, remarkable in extent in some cases, to demonstrate how widely free-running cars could and did roam, taking on a wide variety of different loads in the process. A famous example was a advertisement by the Monon, documenting the first 12 months or so of travel by their new PS-1 box car which carried Monon car number 1. The ad appeared in Trains magazine for September 1948. Shown below are the two pages of the ad, first the map of the travels:


On the facing page was the actual record of travel, with dates and loads. Fascinating reading. You may wish to download this for easier reading (you can click on the image to enlarge it somewhat).


You can download the same list from its original on-line location at:  http://www.monon.org/documents/07-27boxcar1scedule.jpg .  The corresponding map is also available and for example, can be found at: http://www.monon.org/documents/07-27amazing1-5-8-48.jpg .
     This was just a single box car, but there is certainly no reason to think it was untypical of the national fleet of free-running box cars. As modelers, we can take advantage of this reality by not only delivering loads on our layouts carried in cars of every railroad (with frequency perhaps guided by Gilbert-Nelson), but also by recognizing that those loads may be in cars from owners remote from the location at which the car was loaded. In fact, in support of the Car Service Rules (described in moderate detail in a prior post, at: http://modelingthesp.blogspot.com/2012/01/car-service-rules.html ), a very likely car owner for a load arriving from far across the country is in fact your layout’s home road. Yes, maybe that load would be in a car of the home road of the shipper, but there is also quite a good chance that it would be in a car of the home road of the destination consignee, or of a close neighbor of the home road.
     You may of course operate your model railroad as you see fit. But if you are trying to model actual railroading, then this understanding of free-running cars and how they were used is essential to realistic operation.
Tony Thompson